Pai Whoopie Vegan
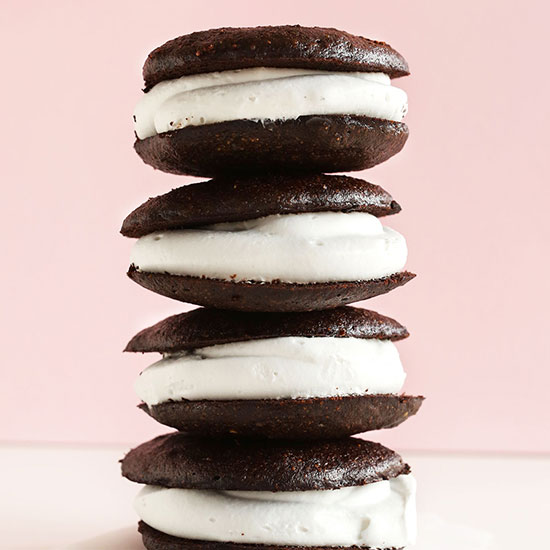
Fluffy, amazing vegan whoopie pies made in just 1 bowl with simple methods! Almost 100% naturally sweetened, gluten-free, and so delicious.
Ingredients
24 servings
Instructions
- In a large mixing bowl, prepare your coconut whipped cream with your chilled coconut cream. Follow these instructions to make a double batch, sweetened to taste (I found 6-8 Tbsp (42-56 g) to be the right amount // amounts as original recipe is written // adjust if altering batch size). Transfer whipped cream to a large freezer bag (for piping) and set in the refrigerator to chill completely. Rinse out the mixing bowl to use for the batter.
- Measure out almond milk in a liquid measuring cup and add apple cider vinegar (or lemon juice) and baking soda and stir. Set aside.
- In your large mixing bowl, prepare flax eggs by combining water and flaxseed meal. Let rest for 5 minutes while you prepare your other ingredients.
- Add the oil, coconut sugar, and maple syrup and whisk to combine.
- Next add applesauce, vanilla, and salt, and whisk to combine. Then add almond milk mixture and whisk again until everything is thoroughly incorporated - about 30 seconds.
- Lastly, add baking powder, cocoa powder, almond meal, oat flour, and gluten-free flour, and whisk to combine, making sure no large clumps remain.
- Transfer batter to the refrigerator to chill/thicken for 20 minutes, and preheat oven to 350 degrees F (176 C). Grease two large baking sheets with non-stick spray (if you don’t have two baking sheets, just use one and bake the cakes in 4 batches // use fewer or more baking sheets, as needed, if altering batch size).
- Once the oven is preheated, scoop out 1 heaping Tbsp amount of batter onto the prepared baking sheets, leaving at least 1-inch of room for spreading. Use your tablespoon to slightly spread them into a small disc. One standard baking sheet should fit 12 cakes. Repeat on second baking sheet.
- Bake for 10-14 minutes, or until the edges appear dry. (I found 12 minutes to be the perfect time.) Remove from oven and let rest on baking sheet for 5 minutes, then carefully transfer to cooling racks to cool completely.
- Repeat this process, baking the mini cakes until all batter is used - you should have about 48 total cakes (amount as original recipe is written // adjust if altering batch size).
- Once the cakes are completely cooled to the touch, clip a small corner of the coconut whipped cream bag off and pipe a generous amount (see photo) of coconut whipped cream onto the under-side of half the cakes (24 as original recipe is written // adjust if altering batch size). Carefully top with another cake of similar size and shape and press down slightly.
- Arrange on large serving plates or a cooled baking sheet and cover loosely with plastic wrap. You can enjoy these immediately; however, I found them to hold up better after 1 hour of refrigeration (and even better after 6 hours or overnight).
- Leftovers will keep covered with plastic wrap in the refrigerator for 3-4 days.
Nutrition per serving
170kcal
💰 Cost Estimate
Total Ingredients
$1840.00
$1840.00
Per Serving
$77.00/serving
$77.00/serving
🏠 Savings
~$3680.00 vs buying!
~$3680.00 vs buying!
📋 Price Breakdown (94% ingredients detected)
| Ingredient | Amount | Subtotal |
|---|---|---|
| unsweetened plain almond milk | 0.5 cup | $12.00 |
| apple cider vinegar or lemon juice | 0.75 tsp | $1.00 |
| baking soda | 0.5 tsp | $1.00 |
| flaxseed meal | 2 tbsp | - |
| water | 5 tbsp | - |
| avocado oil | 0.25 cup | $44.00 |
| coconut sugar | 0.3333333333333333 cup | $4.00 |
| maple syrup or agave nectar | 0.3333333333333333 cup | $207.00 |
| unsweetened applesauce | 0.75 cups | $136.00 |
| pure vanilla extract | 0.5 tsp | $25.00 |
| sea salt | 0.25 tsp | - |
| baking powder | 0.5 tsp | $3.00 |
| heaping cup unsweetened cocoa powder | 0.5 | $588.00 |
| almond meal | 0.5 cup | $488.00 |
| gluten-free oat flour | 0.25 cup | $10.00 |
| heaping cups gluten-free flour blend* | 0.75 | $13.00 |
| batches coconut whipped cream | 2 | $308.00 |
*Estimated market prices, may vary by region
Recipe Assistant
Ask anything about this recipe



Comments
Loading comments...